Looking into OpenVPN and Linux Networking Using Network Namespaces
By Phillip Adler
What a VPN Accomplishes
Note : What we are covering here is a TLS/SSL VPN, which means that the original IP+TCP payload is encrypted as payload in a TLS/SSL VPN Connection.
What a VPN needs to accomplish
- Encrypt all payloads (Either Ethernet or L2 headers + IP headers + Transport headers + Transport Payload, or L2 headers + IP Headers + Transport headers + Transport Payload) in a tunnel between a client and a server, and never expose the original headers to a sniffing party, on (probably) all traffic leaving, which involves changing in routing rules
- Be able to bring up and bring down in minimal amounts of effort and time
- In this instance, certificate validation before initializing a connection.
- Exhibit Desiring Forwarding Behavior (For example, is it connecting as an outsider to a LAN, is it going to be routed over the internet or to another L3 routing device? etc.)
What We will be Doing
This article was written largely because I was finding parts of the Networking confusing and had no idea how to go about debugging potential problems. Most of what is deciphered here is by looking through wireshark, rather than some fundamental knowledge of OpenVPN or VPNs in general.
We will be setting up a VPN between a client in TUN Mode (maybe at a later date, I will talk about TAP mode), and examining and debugging at a network layer problems if we don’t configure the VPN correctly.
Each “agent” or “router” will operate with its own network stack in its own network namespace. This is partly to practice working with Linux networking and partly to be able to examine all components on a single machine.
Setting up the “Clients” And “Server” Networks
Since my Local Network Is 192.168.1.0/24, I will be running my address blocks for the VPN clients and server in the 192.168.0.0/16 range outside of this and a single non-conflicting route can be added to interfaces to still allow default traffic through my LAN.
For a Quick View of what We’ll Be Setting up
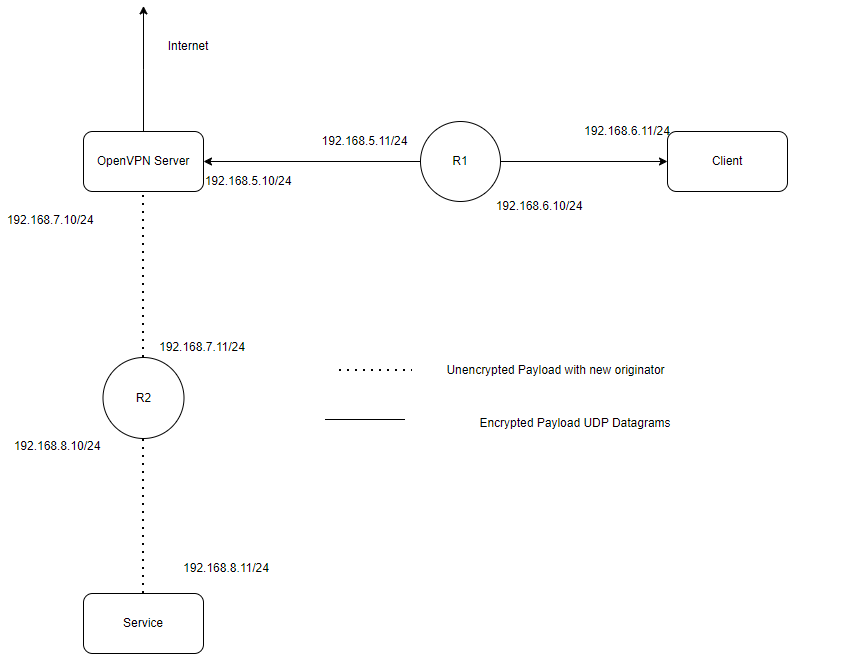
OpenVPN Server : Will run in Root Network Namespace
VPN Client1 : Will run in c1 Namespace
VPN Client2 : (Undecided)
Service : (app Network Namespace)
Router 1 : (r1 Network Namespace)
Router #2 : (r2 Network Namespace)
The first thing we should do is bring up these networks and ensure routing is enabled between them.
Note * The Purpose of creating these networks is to demonstrate the results of tunneling, this actually isn’t representative of actual internet routing. Usually You’d have something like :
(TBD)
Shoutout to https://iximiuz.com/en/posts/container-networking-is-simple/ for a really good explanation of namespaces (network in particular) and veth and vbridge devices and how they are used by containers
Setup Network Namespaces
sudo ip netns add r1  #Network Namespace that the “The Internet” Router 1 Will Live in

	sudo ip netns add r2 #Network Namespace that the “The Internet” Router 2 Will Live in

	sudo ip netns add c2 #Network Namespace VPN Client #2 Will Live In

	sudo ip netns add c1 #Network Namespace VPN Server Will Live In

	sudo ip netns add app #Network Namespace Service Will Live In
Create Virtual Ethernet Links
(We will simply create point to point links between routers, clients, and servers instead of using bridges as each host will be its own subnet). Remember, this is to demonstrate VPN networking and not actual
sudo ip link add veth1 type veth peer ceth1 #Link Between S and Router1

	sudo ip link add veth2 type veth peer ceth2 #Link Between R1 and C1

	sudo ip link add veth3 type veth peer ceth3 #Link Between S and R2

	sudo ip link add veth4 type veth peer ceth4 #Link Between R2 and app
#Note That No IPs or Routes Have Been Assigned Yet
Move Links to the Correct Network Namespace
sudo ip link set ceth1 netns r1

	sudo ip link set veth2 netns r1

	sudo ip link set ceth2 netns c1

	sudo ip link set ceth3 netns r2

	sudo ip link set veth4 netns r2

	sudo ip link set ceth4 netns app
#Note That No IPs or Routes Have Been Assigned Yet
Setting Up Networking
Create Routing Between s and r1
sudo ip link set dev veth1 up
	sudo ip addr add 192.168.5.10/24 dev veth1
	sudo ip route add 192.168.6.0/24 dev veth1 via 192.168.5.11

	#Enter r1 Namespace, or in a new shell
	sudo nsenter --net=/var/run/netns/r1
	sudo ip link set dev ceth1 up
	sudo ip addr add 192.168.5.11/24 dev ceth1
	sudo ip route add default dev ceth1 via 192.168.5.10

	ping 192.168.5.10 #Test if Works
	ping $eth0 #Replace with IP of your default gateway src ip of your root network namespae
	exit

	#If you'd like, run a shell in that namespace in another process and confirm using
	sudo lsns
	#This will tell you processes running in each namespace (including others)
Setting up Networking Between r1 and c1
	sudo nsenter --net=/var/run/netns/r1
	sudo ip link set dev veth2 up
	sudo ip addr add 192.168.6.10/24 dev veth2
	exit


	#------------------               --------------------#

	sudo nsenter --net=/var/run/netns/c1
	sudo ip link set dev ceth2 up
	sudo ip addr add 192.168.6.11/24 dev ceth2
	sudo ip route add default dev ceth2 via 192.168.6.10

	#Test Both Hops
	ping 192.168.6.10 #Should Work, This confirms the correct routing in both directions
	ping 192.168.5.10 #Should Work, But Doesn't ?
	exit
How can we figure out what is happening?
Look at Iptables -L -v -n
This looks at the iptables filter table
After running ping 192.168.5.10 I can see no increases in accepted packets for any chains
After running ping 192.168.6.11, I see increases in accepted packets in the OUTPUT and INPUT chains.
This can quickly see if it there’s matches to a DROP target in the filter table in either the output or input chains.
Now running ping 192.168.5.10 from the c1 namespace
Using cat /proc/net/dev inside the r1 namespace
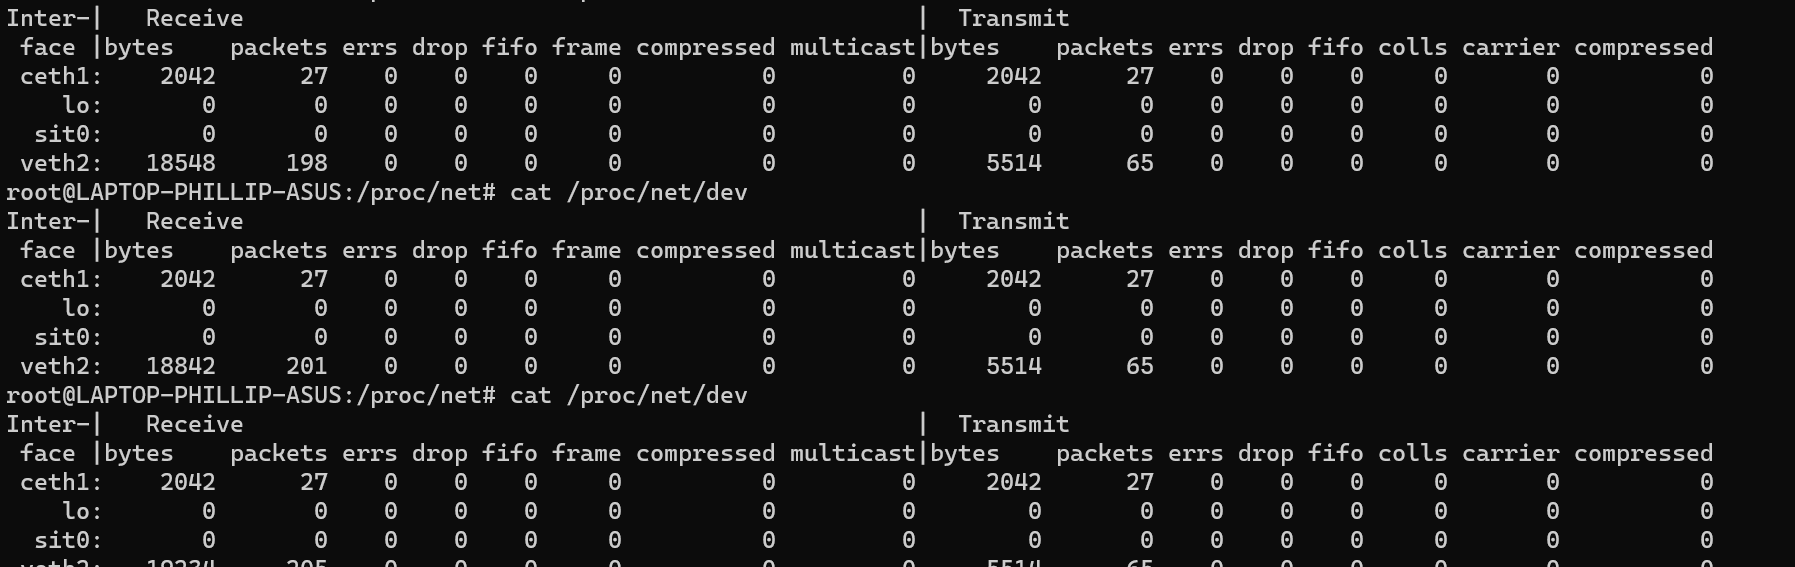
I can clearly see that packets are arriving on the veth2 interface, but nothing is being forwarded to the ceth1 interface (transmit), and nothing is responding, but aren’t being Dropped by an iptables filter chain.
The extra confusion can be that when you try to ping a route that IS NOT reachable but with forwarding enabled, you will get an “ICMP Net Unavailable” Ping status response
Fix:
#------------------               --------------------#

	#Why Isn't it Working? Simply because we need to configure our linux server
	#As a Router that can forward ipv4 packets

	#Now Lets Fix it
	sudo nsenter --net=/var/run/netns/r1
	sysctl -w net.ipv4.conf.all.forwarding=1

	#To Confirm
	sysctl net.ipv4.ip_forward
	exit

	sudo nsenter --net=/var/run/netns/c1
	ping 192.168.5.10 #Should Work
	exit
Now ping 192.168.5.10 from c1 and record traffic in r1 again:
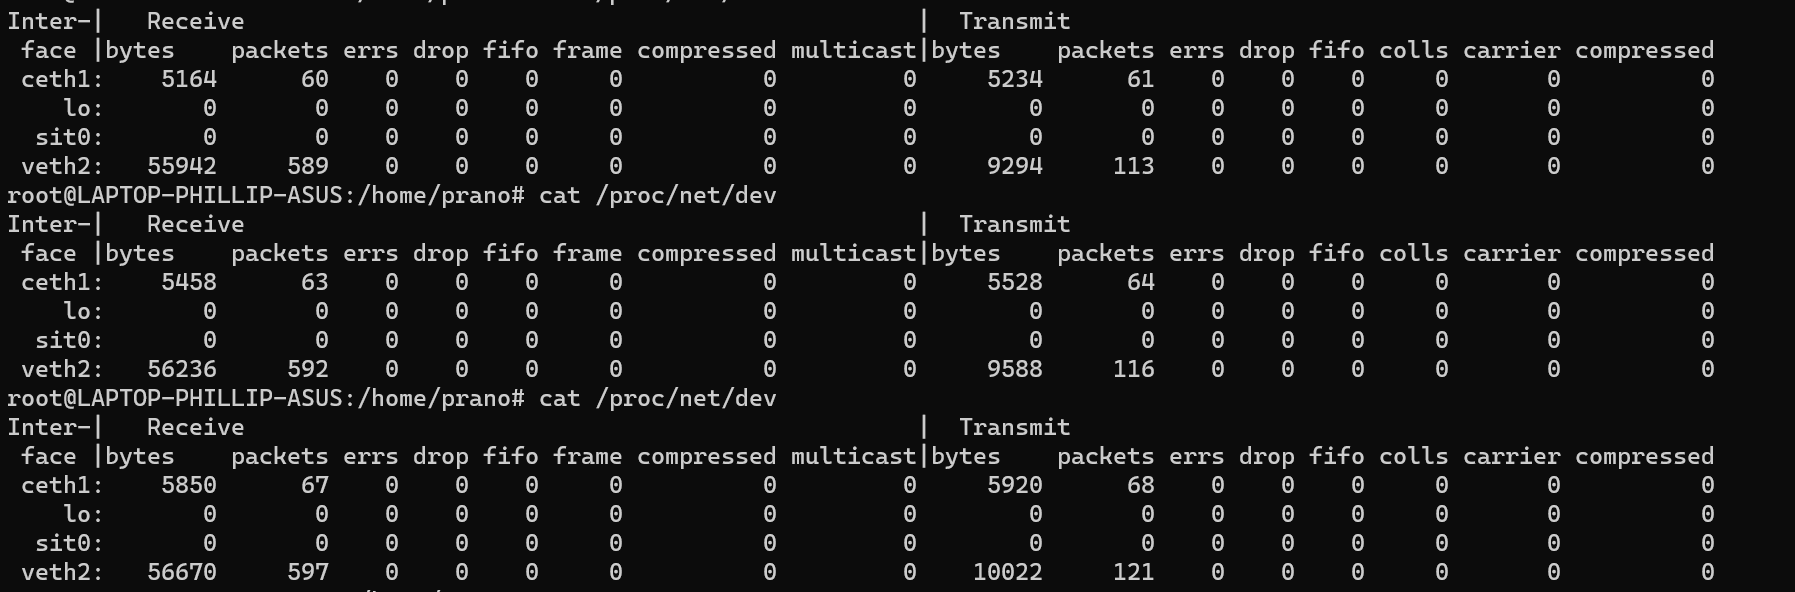
We can now equal increase in both transmit / receive columns for ceth1
Silly Mistake I made Earlier:
I previously had created routes from 192.168.5.10/24 to 192.168.6.11/24 and vice versa by simply calling
$ ip route add 192.168.6.0/24 dev veth1The result was this : (a6:* is ceth2 here trying to reach veth1)
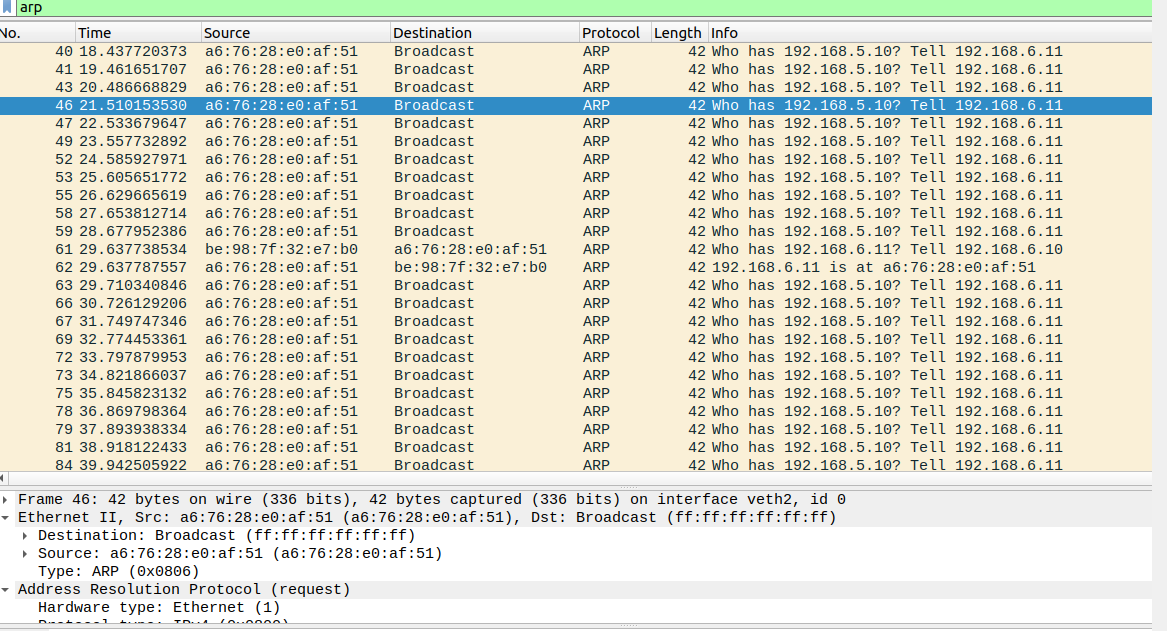
Since veth1 had no idea if if 192.168.11.6 was on a switch, bridge, or on the opposite side of the router in a different network, it assumed it was on the same network and sent a bunch of arp requests when I tried to ping.
Specifying
ip route add 192.168.6.0/24 dev veth1 via 192.168.5.11 told us that its on the opposite side of the router and to use the mac address of 192.168.5.11 (the gateway) in the ethernet frame.
The “ip addr add” is necessary in c1 and app because it needs to know a source address to listen on and send packets on.
Finishing up the rest of it (server to r2, r2 to app)
#Back In Root Network Namespace
	sudo ip link set veth3 up
	sudo ip addr add 192.168.7.10/24 dev veth3
	sudo ip route add 192.168.8.0/24 dev veth3 via 192.168.7.11


	sudo nsenter --net=/var/run/netns/r2
	sudo ip link set ceth3 up
	sudo ip addr add 192.168.7.11/24 dev ceth3
	sudo ip link set veth4 up
	sudo ip addr add 192.168.8.10/24 dev veth4
	sudo sysctl -w net.ipv4.conf.all.forwarding=1
	sudo ip route add default dev ceth3 via 192.168.7.10
	exit

	sudo nsenter --net=/var/run/netns/app
	sudo ip addr add 192.168.8.11/24 dev ceth4
	sudo ip link set ceth4 up
	sudo ip route add default dev ceth4 via 192.168.8.10

	#Test if Forwarding Works
	ping 192.168.7.10
	python3 -m http.server 9000 #Keep Attached in a new shell
Back In Root Namespace
ping 192.168.8.11 #Does Not Work

	#There's a chance you may be able to demonstrate that it isn't being forwarded to the right interface using:
	traceroute 192.168.8.11


	#Fix For Our Local Network (Manual Routing instead of a distributed routing protocol like OSPF)
	sudo ip addr add 192.168.8.10/24 dev veth3
	sudo ip

	curl 192.168.8.11:9000 #Works, Gets HTML Page Back
Setting up the Service and Client Application
The Client & Server Application Will be a simple gRPC application to confirm the originator of the IP packets that reach the Server are indeed the VPN, and that the original payload is intact after exiting the VPN.
(TBD)
Creating Certificates for Server & Client
(Borrowed Largely From https://www.digitalocean.com/community/tutorials/how-to-set-up-and-configure-an-openvpn-server-on-ubuntu-20-04#step-1-installing-openvpn-and-easy-rsa)
- For now, just follow this tutorial (we’ll get to client2 later). Instead of using scp, decide how you are going to store the local certificate and keys.
- Be sure to skip the optional parts of steps 7, and steps 8&9 , later we’ll get to later.
- And use 192.168.5.10 for the VPN Server.
- For, now don’t run the Client or Server.
The end result will be something like
- A CA, Client, and Server key and signed certificates.
- Server configured symmetric key exchange using ecc and sha512 for digest
- Pre-shared key (ta.key) for TLS-crypt setting
- Configured cipher for encryption
- Message Digest algorithm for HMAC
- Client Configuration File to talk to VPN IP (Use 192.168.5.10 in this instance)
The end Goal Is :
We have generated a self-signed Certificate Authority to ensure rooted trusted, that is distributed to both the Server and Client for mutual Authentication.
We have generated keys and certificates by the CA for both the server and client.
The certificates and keys are distributed to both the client and server to use (passed into the OpenVPN software process).
Creating The CA Certificate & Key
(TBD)
Creating The Server Certificate and Keys
(TBD)
Creating Key and Certificates for Client
(TBD)
Distribute Keys to Server and Client
(TBD)
Configuring OpenVPN software and Creating OVPN File
(TBD)
Setting Up Networking for The Server
Now that we have the server config file , the client config file,
Here we will understand the Linux IPTables and sysctl commands that will be needed to successfully turn the OpenVPN into a router / proxy for the client.
First Trying to Reach the public Internet:
Creating a pcap dump of the traffic
We will use tshark to records tracefiles
To begin recording in each network namespace)
s: tshark -i eth0 -i tun0 -i veth1 -w capture-output-s.pcap
c1: tshark -i ceth2 -i tun0 -w capture-out-c1.pcap
r1: tshark -i ceth1 -i veth2 -w capture-out-r1.pcap
r2: tshark -i ceth3 -i veth4 -w capture-out-r2.pcap
app: tshark -i ceth4 -w capture-out-app.pcap
-i is to read from an interface
-w is the output file
You’ll have 9 processes for this, all the tsharks, plus openvpn server, openvpn client, the python http server in app, and ping application running in the c1 network namespace.
Start the VPN Server and Cient
Our c1 routes go from :

to:
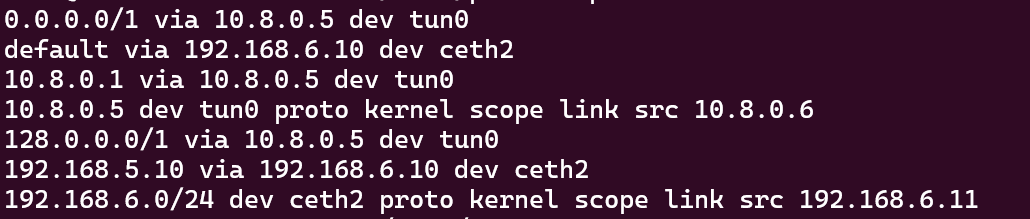
This is what is meant by “Start Up Quickly” with no outside configuration to network clients, OpenVPN simply adds a new device and new ip route rules to forward what was previously non-matching traffic in the 128.0.0./1 and 0.0.0.0/1 range (essentially, everything but default will match over these) to the OpenVPN software.
So anything outside of the 192.168.5.0/32, 192.168.6.0/24 and 192.168.5.10/24 will be routed through tun0 to 10.8.0.5.
Tuns do not operate at the L2 level.
We can test this
traceroute 172.31.250.216 #This is my default network interface for WSL
	1   172.31.250.216  0.404ms  0.293ms  0.287ms

	traceroute 192.168.5.10
	1   192.168.6.10  0.004ms  0.003ms  0.002ms
	  2   192.168.5.10  0.002ms  0.003ms  0.004ms

	# I can see it exists on the 192.168.6.10 interface
	#Why is this
Take Note of ip addr

We can see that tun has a peer here
I ran :
ping 192.168.5.10
traceroute 192.168.5.10
ping 172.31.250.216
traceroute 172.31.250.216
You can see How ICMP messages to 192.168.5.10 crossed straight over

But to 172.31.250.216
You can see that the request goes Tun → (OpenVPN client with new destination source ) → Ceth2 with default route via 192.168.6.10 to OpenVPN machine with Ceth2 IP Address
Mistake #1 → No Forwarding Allowed (On the root namespace)
Neither pinging 192.168.8.11 nor 8.8.8.8 (Google DNS works)
Fix:
In root namespace
sysctl -w net.ipv4.conf.all.forwarding=1
Now ping 192.168.8.11 works

but ping 8.8.8.8 does not
If we run traceroute 8.8.8.8 we get something like :

What is going on?
Let’s recapture
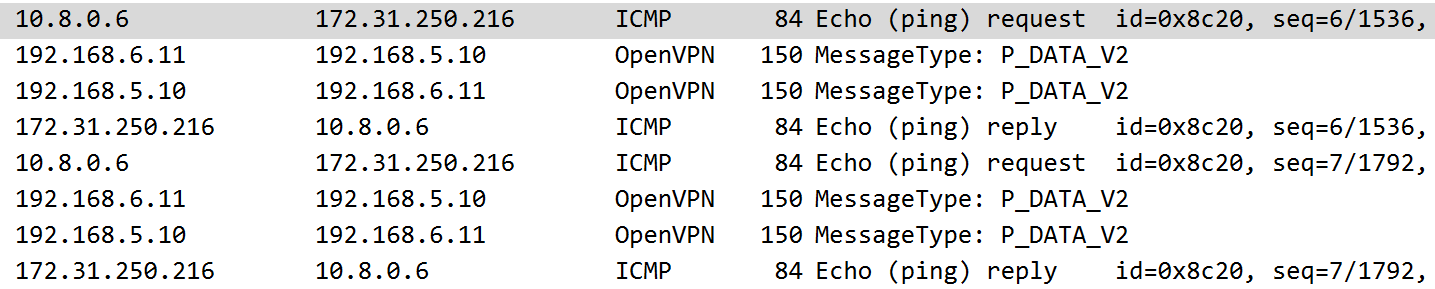
On the client:

We simply see no reply - no “Host Unreachable”. This is because as far as the openvpn server namespace is aware of this, the host is seen as reachable (has a default route)
On the server

A similar thing is happening (note that the two pings from 10.8.0.6 to 8.8.8.8, one is on the tun0 interface and the other is on the eth0 interface)
This is because the client sends a UDP packet that is to be delivered to the OpenVPN server listening at 192.168.5.10. It then decrypts and authenticates this UDP packet , which contains an IP Payload inside, in this case a ping. On the client side, this packet emerged was passed to tun0 which had an ip address of 10.8.0.6

What is happening is that the packet is being forwarded onto the local network with the src ip 10.8.0.6, something my local network has no clue on how to route
What is happening on the “TUN” is that server essentially has a bunch of IP addresses over TUN interfaces with clients,

This raw interface shows that there isn’t an L2 encapsulation layer - its straight L3.
I’m guessing that the OpenVPN server tracks/understands that a packet with Src 10.8.0.6 has a pair 10.8.0.5 and handles that as part of the application, but I’m not sure.
Essentially what we have here, is TUN acting as a sort of raw IP remote program data transfer (TUN is essentially a delivery mechanism through IP headers to application extended memory), but with the added benefit that the originating application does not have to be aware of this, its simply configured by changes in routing rules as we saw when we started the OpenVPN server and client.
To learn more about Tun, you can search up how to interact with the tun device using ioctl calls in C, this entails specifying a pointer to a data structure with a name in ioctl call to the tun device driver, and interacting it as a file descriptor.
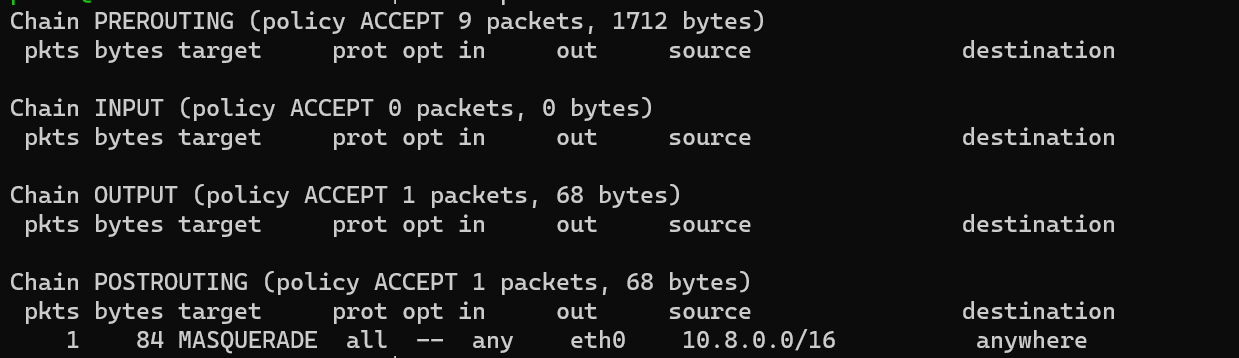
Mistake #2 → No POSTROUTING iptable rules configured
Fix:
# sudo iptables -A POSTROUTING -t nat -j accept #Accept All on POSTROUTING chain in NAT table
	sudo iptables -A POSTROUTING -t nat -s 10.8.0.0/16 -o eth0 -j MASQUERADE

	#Confirm
	sudo iptables -L -v -t nat

	#Now go back to the c1 netns
	ping 8.8.8.8 #IT WORKS !!!!!!!!!!!

	#Now inside root namespace
	sudo iptables -L -v -t nat
	#Watch packets match rules !!
	#You can see each rule in the chain in the table match packets
What Masquerade is doing is making the machine running the VPN server act as a source nat. “-s” matches source ips (10.8.0.6 is inside of 10.8.0.0/16), and -o matches against an output device, and Masquerade tells to rewrite the TCP/IP headers to act as a Source NAT.
Interestingly enough the results of iptables -L -v -t nat will look like:
We will only see 1 packet, that’s because iptables actually only matches the connection and then uses conntrack state table to forward packets.
Using contrack -L you can find the table entries:

Here, its not as interesting since there is no sports or dports, but we will show that in a minute with a TCP application
Mistake #3 → You are still using the 10.8.0.6 SRC when forwarding to the App Namespace.
By capturing with tshark in the app namespace you can see this:
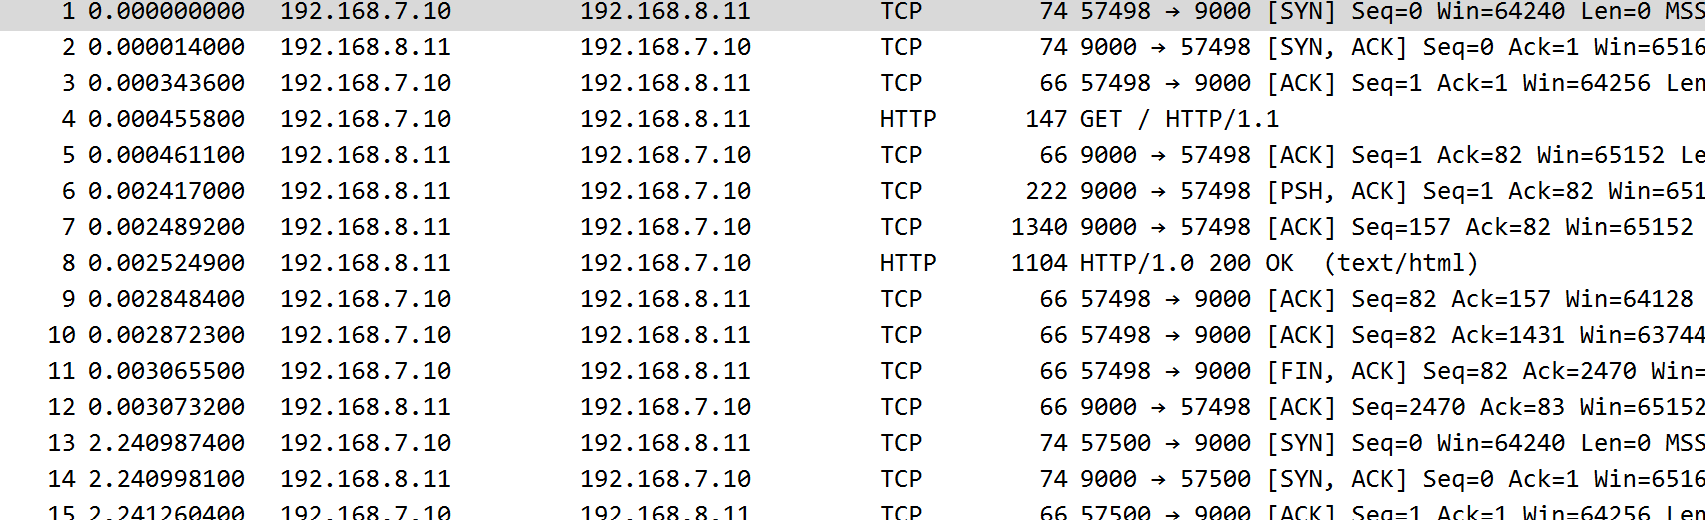
In the c1 namespace, run curl 192.168.8.11:9000
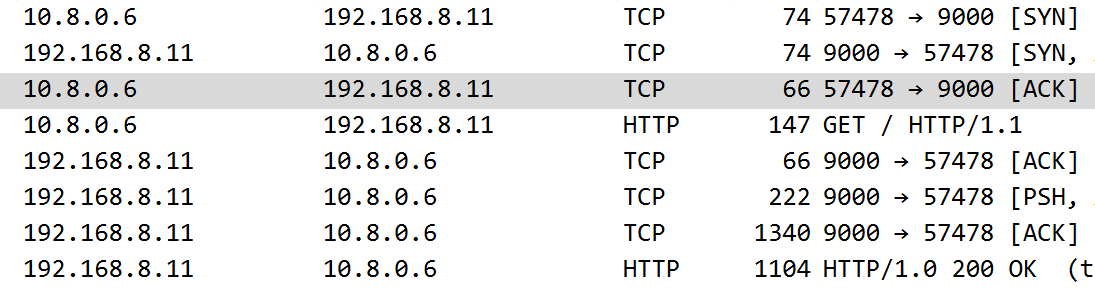
You can see that we are forwarding packets with 10.8.0.6, and in this case, the packets will still be routed back properly (by coincidence, do not ever count on this).
This is because it follows 2 default gateway passes back to the OpenVPN server, which routes back everything in the “VPN Subnet Range” back to tun0 to have the response re-encrypted and sent back to 10.8.0.6 over the tunnel.
Now, write a similar source nat rule as before using masquerade
sudo iptables -A POSTROUTING -t nat -s 10.8.0.0/16 -o veth3 -j MASQUERADENow capture again and spam curl from c1 and you will see:
You can see now that the packets inherit the IP address of the VPN interface connected to R2.
Looking at conntrack

You can see the NAT mappings , (10.8.0.6 : 57492, 192.168.8.11:9000).
Its essentially forwarding port 57492 on that interface to 10.8.0.6: 57492, (in the first entry), if its a full cone NAT it will enforce matching IPs or incoming connections, I’m not sure if it is, but it will work for this instance. The outbound source port in this instance is dynamically allocated
Now Running in subnet instead of net-30 mode
go to the server.conf file in /etc/openvpn/server and uncomment the line:
;technology subnet
Now restart the openvpn server and restart the vpn clients and look at routes and links:
On the Client

On the Server

We can see that there is no “pair ” for each Tun and it does not allocate a /30 subnet to every client.

The 2 ICMP req/reply response to tun0 and eth0 interface capture.
We can see that the client has an address of 10.8.0.4, so its clearly not using a /30 otherwise this would be a broadcast address.

Deep-Look Into VPN Networking
Creating a Wireshark Dump of the Traffic:
Viewing and Filtering Wireshark Traffic:
Net-30 vs Subnet Topology:
Tun vs. Tap Mode:
Traceroute Before and After :
Adding STUN server Experiment:
GRPC Server Experiment:
VPN vs. SSH Tunneling Experiment
Now Turn off both the VPN client and VPN server
Type in something like:
ssh -f -N -L 4438:192.168.8.11:9000 prano@172.31.250.216
sudo ip link set lo up # OR whatever the loopback interface is
Record Wireshark on app, c1, and root namespace (where the OpenVPN server was previously), removing tun0 from both c1 and s capture, but add lo to c1 capture.
Now try curl 127.0.0.1:4438
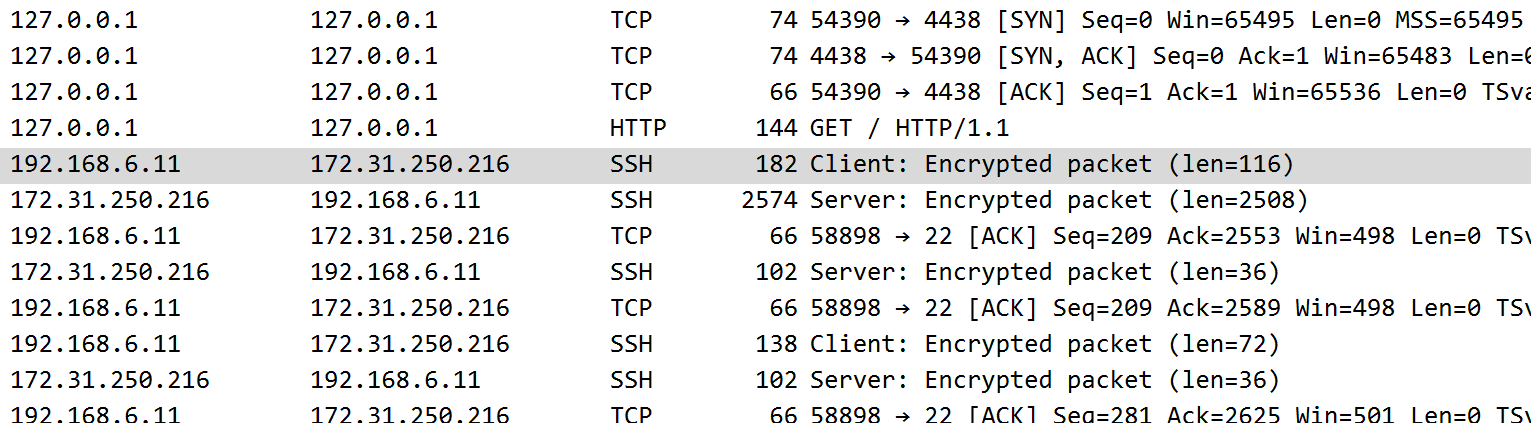
on c1, you can see a separate TCP connection from the curl client being made to the SSH tunnel process, followed by an HTTP request, followed by an encrypted TCP payload (SSH/TLS protocol). You can see that its simply transferring data over an established SSH connection, and you can even see ACK TCP segments that have no encrypted payload.
On the Server:
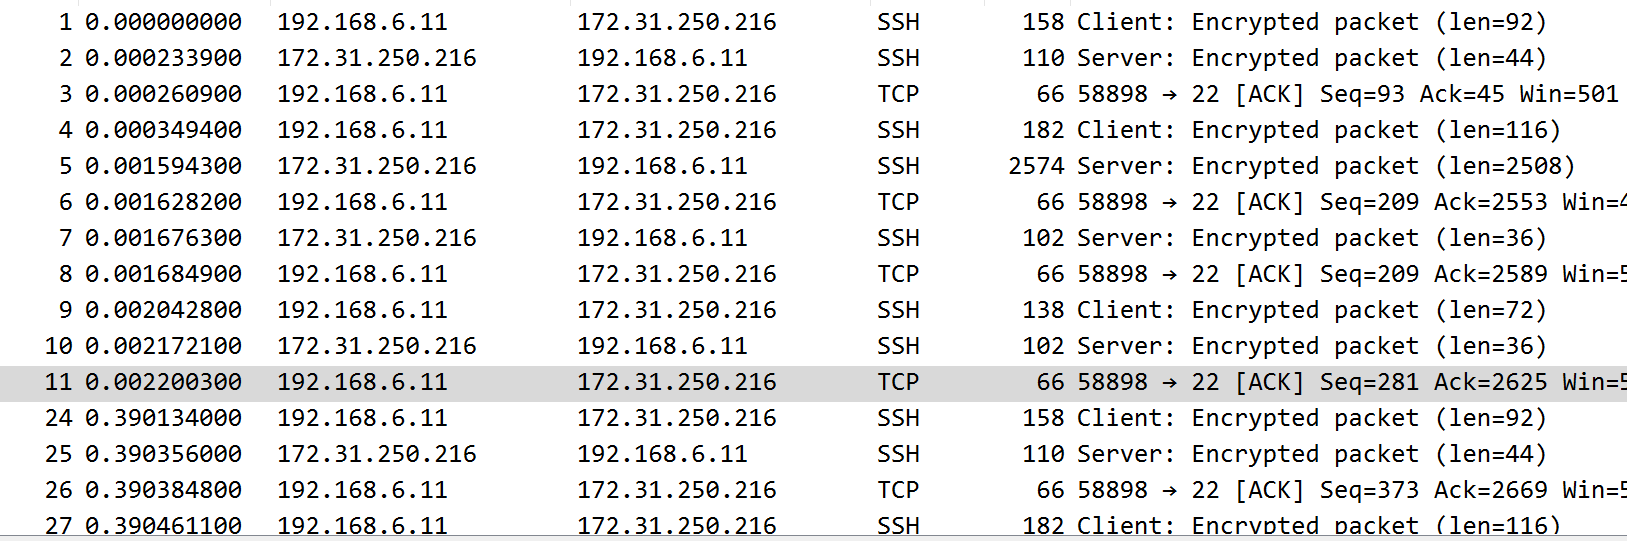
You can see encrypted connections between the client and server, and re-encapsulated packets at re-encapsulated with new IP /TCP headers on the other side, a brand new TCP connection it seems like that transfers over the decrypted TCP payload to the other side is my best guess.

Long story short, the difference is the client has to be aware to the level of establishing a connection to a known ssh tunnel listener on a localhost, and it involves full ssh access to a shell, while with openvpn users authenticate as nobody/nogroup.
SSH tunnel operates on the level of encrypting a TCP payload over a medium to a secure channel to transfer to a new connection with new TCP headers, with a VPN you can choose to masquerade the output or not, and raw IP packets are sent over where the encrypted payload includes IP headers and TCP headers that will be “re-established” upon decrypting.
TAP Mode
We saw that in Tun mode, that the packets to-be-encrypted did not have any L2 Layer headers. What happens is that its passed as a raw routable IP-frame and needs to be routed out an interface and inherit its MAC address (link),. It would also preclude MAC broadcasts to learn addresses. If we wanted to act as an Ethernet device directly, we need to use TAP, which means that if we VPN to a VPN gateway and have the packet forwarded to a bridge or switch to be routed after learning a MAC address via ARP of the destination, you would need to have your own Address (also to respond to ARP requests).
(Implementation TBD)
Adding LDAP Authentication
(TBD)